

If you are interested in creating the blog on blogger. First
thing need to learn about blogger is to design the Blogger theme. To change the
design of Bloggers (blogspot) look, you have to alter its theme or template
includes additional or customized HTML, CSS, JavaScript codes. Prior to
altering HTML or XML you ought to be aware of the backup of your current
introduced XML Theme or Template.
Else, you may lose past design or codes to
reuse, since there have confinement steps to go past (fix) design by Ctrl + Z or forward/redo
by Ctrl + Y
STEP TO STEP PROCESS GUIDE TO EDIT BLOGGER XML Design TEMPLATE
To start with, we will perceive how to restore/backup Blogger/Blogspot design.

BACKUP YOUR BLOGGER XML FOR FUTURE
Your current introduced theme is the most significant and
important property of your blog or site. The carelessness to backup may bring
out large damages, for example, losing important variable data or codes. In
that condition If you Have the backup file for your Blogger XML to your
Computer index, you can transfer whenever you have to reestablish your past
theme.
STEP-1: Open Blogger Dashboard, Move to Theme option
and you will see like below.


STEP-2: Click on the Download option in the pop-up option. The backup file will start downloading automatically in the Download directory of
your computer.

How to INSTALL/UPLOAD BLOGGER XML THEME
Previous theme backup or new premium or free Blogger XML theme can
be uploaded using the restore option as per our requirement for the new design
of the Blogger.
Step TO INSTALL BLOGGER TEMPLATE:
Step by step process to install the new or backup XML theme
on the blogger. Follow the step below to install the new theme
STEP-1: Open Blogger Dashboard, Go to the 3 dots option. Click on the ‘Restore’ option in pop up according to the figure.
STEP-2: Click on ‘Upload option to update the New/Backup Blogger XML File as following the figure.

STEP-3: Now you will be redirected to your Computer Drive.
Find the drive where you have saved or download New/Backup Blogger Theme to upload.
After getting the desired drive in the computer select the Blogger XML template file
and ‘Open'.

EDIT Your BLOGGER HTML & XML
If you want to
- Add or remove codes,
- Minify or beautify,
- Design etc.
You have to edit Blogger HTML & XML.
Multiple ways are there to edit Blogger HTML on your Desktop through HTML editors like Dreamweaver, Sublime Text, Notepad++, Gedit, etc or Blogger HTML editor window.
Multiple ways are there to edit Blogger HTML on your Desktop through HTML editors like Dreamweaver, Sublime Text, Notepad++, Gedit, etc or Blogger HTML editor window.
First, create an XML file of Your theme code and after that, you can edit in Desktop HTML
editor.
On another side, Blogger Editor have more advantage in editing the Code for design of your theme
On another side, Blogger Editor have more advantage in editing the Code for design of your theme
Example:
- You can see preview your changes on your Blogger but it wouldn’t available on Desktop Editor because of the XML file.
- You can jump to widget easily what is impossible at Desktop Editor.
- After any changes, you can save your theme instantly, what is bored for Desktop Editor.
Customize or change the design Blog or Website from Browser
STEP-1: Choose
the Blogger or website page you want to customize. Lets selected the Homepage.
STEP-2: Select the elements (Font, Div, Table, Form, Button, etc.) of your Blog and select Firebug/Inspect Element/Other tools to inspect elements from Right Button Click.
STEP-2: Select the elements (Font, Div, Table, Form, Button, etc.) of your Blog and select Firebug/Inspect Element/Other tools to inspect elements from Right Button Click.

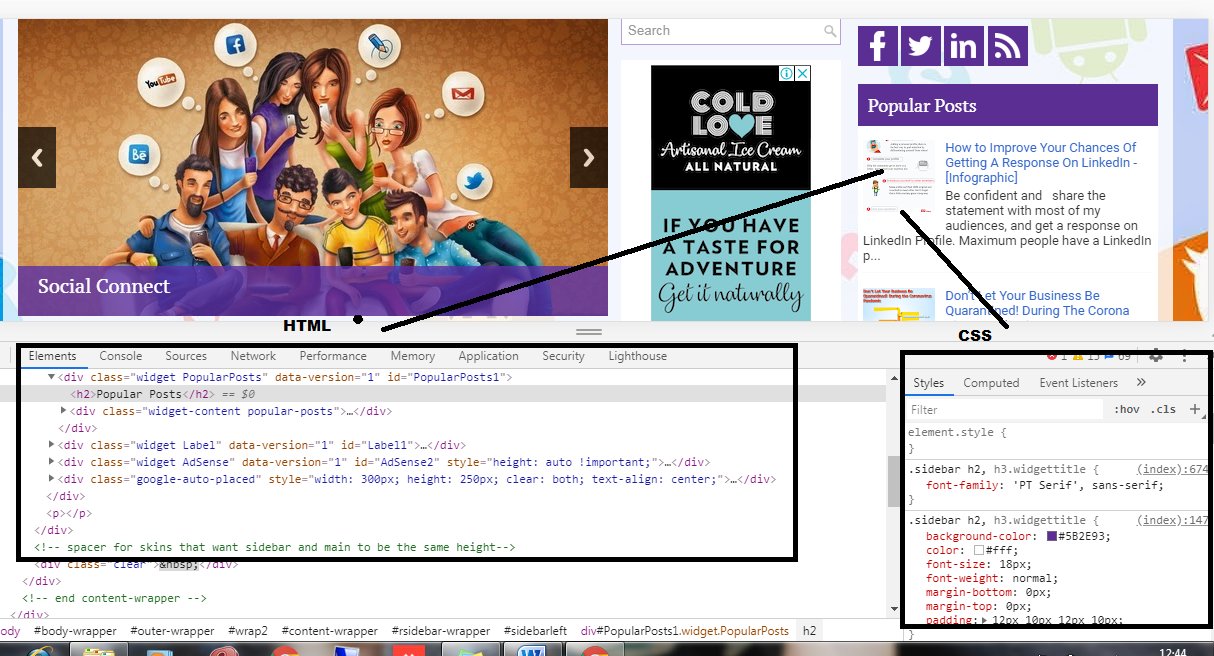
If you want to select the font and want to change the font size.
To change the font size, click on the value of font-size and set as you want.
You can analyze the changes in live. Similarly, you can edit color, background, width etc. You can also add more CSS after it.
STEP-3: After customizing the CSS, we have to change on Blogger HTML Codes. Otherwise, It doesn’t effect at the time of reloading the page. So copy the customized or changed CSS to your theme. To do that we have to mainly two works:
- Find the name of ID/Class of customized CSS from Blogger HTML what we have done on Blog.
- Copy the changed CSS and paste to the selected ID/Class on Blogger HTML.
STEP-4: Copy the name of class or id of CSS.

STEP-5: Open the Blogger dashboard and follow the step Dashboard – Theme-3 dot – Edit Theme

And To enable edit, click on the code
STEP-6: Use Ctrl + F using the
Keyboard and Ctrl + V. then hit ENTER. You will find the
required CSS to change.

STEP-7: Now go to the previous tab but don’t close the current tab and copy the whole CSS under the name or ID as below.
STEP-8: Use paste by Ctrl + V to
paste the CSS to the correct place to change the Theme CSS as per requirement.

If you click on Preview
Theme option, you will preview of your Blog here. But be patient to
see.
FORMAT BLOGGER HTML & XML
Editing codes result in a good look with the proper
indention and help to understand, navigate codes easily. You can format codes
within Blogger XML Theme on Blogger HTML Editor now.
Follow the below steps.
STEP-1: Go to Blogger Dashboard → Theme → Edit
HTML
STEP-2: Click on ‘Format Theme’ to format. If you want redo formatting, then ‘Revert Changes’.’.
